Quantcast
Channel: Photography – Model Mayhem Blog
Viewing all 235 articles
Browse latest View live

Pic of the Day recap

$
0
0

This week’s notable entries come from David Naman, Missildine Arts, Francisco Castro, Derek Galon, Ashara, and more…

November 2, 2013


Photographer: David Naman; Model: Ashara

This image brings the term “grabbing the brass ring” to a whole new level.

November 1, 2013


Photographer: DOUGLASFOTOS

Hands up all those that feel this is the pick for the day.

Halloween – October 31, 2013 – booo!!!!


Photographer: Missildine Arts

“but Daddy, you said I came from the cabbage patch….”

October 30, 2013


Photographer: imcFOTO

“What good is sitting alone in your room? – Come hear the music play”

October 29, 2013


Photographer: Francisco Castro

True artists always get right into their painting.

October 28, 2013


Model: K I C K H A M; Photographer: Star

Totally tongue-tied in a total tide.

October 27, 2013


Photographer: Derek Galon

“hmmmm, let’s see, that’s butter, eggs, yogurt, milk…. and gotta get more candles…”


Model Mayhem’s November 2013 cover photo

$
0
0

Model Mayhem’s November 2013 cover photo features Masuimi Max, wearing Jupiter Moon 3, Hades footwear, and was shot by Morat Photography.


Model: Masuimi Max; Photographer: Morat Photography; Clothing Designer: Jupiter Moon 3

Masuimi’s list of credits is so vast, with nearly 100 magazine covers and many more features, music videos, TV shows and movies, that it’s almost impossible to select a few highlights. She recently launched her own makeup line, I Am Sin, and her website, I Am Trouble, has over 50,000 images!

We spent an afternoon with Masuimi and you can learn more about her in the Model Mayhem interview.
Like Model Mayhem on Facebook to check out how it looks.

Do you want to be our Facebook cover photo?

We’re accepting submissions from Model Mayhem members! So, if you’d like to be featured in an upcoming month, send a message to Model Mayhem Edu with a link to the image in your MM portfolio that you’d like to enter.

How to create a perfect clear white background

$
0
0

A clean white background, if used effectively, can give great impact to your images. This is especially the case if you’re aware of balancing objects in negative space, along with creating interesting shapes with your model.

The clean white background is the first and most important lighting set-up you should learn to do, along with playing with shapes that you can move around on a layout.

This technique means learning about controlling your shoot using just two elements: background (negative space) and the model (object).

The very nature of the contrast and separation between the subject and the background gives your shots great impact; it helps to illustrate and to understand composition, control framing and metering. All very helpful on your learning curve to shooting fashion.

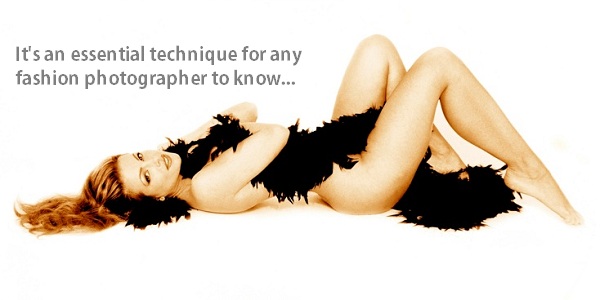
In the fashion industry, the clean white background set-up is the most commonly used fashion lighting technique for everything from advertising fashion (creating brand awareness), catalogs and look-books (selling off the page) and editorial fashion (reflecting fashion trends).

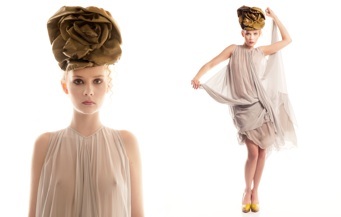
The lighting techniques required to create a perfectly clean white background must be set-up very accurately, not allowing the background lighting to spill onto the subject (see image below), although a bit of spill-over is not necessarily wrong, if it’s a creative choice.

The technique for clean white backgrounds is described (and diagrammed) further down the page. This article illustrates lighting the subject independently from the background, either front lit, side lit or top lit, also allowing you to control the contrast of the lighting on your subject, helping you to understand and to control lighting, taking readings as well as to control the contrast of your lighting.

The techniques for setting up a clean white background

I am going to describe two variations on the technique, the first is for those lucky enough to have a large studio space with a good studio size and height above 12’ and second for the smaller studio space with limited height.

Clean white background

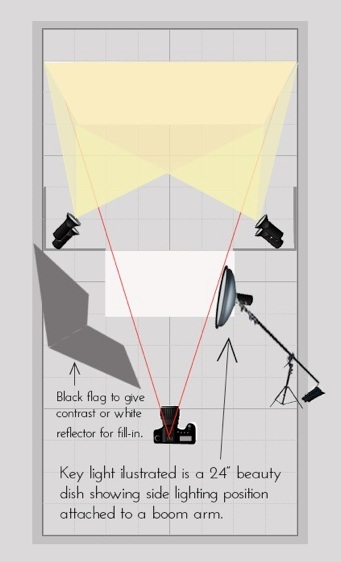
You need a white wall ~12’ high x 12’ wide and floor space of ~20’ wide x 30’ long, ideally use a coved studio of at least the above size if you have access to one or 9’ colorama or 10’ vinyl back drop will do the job OK for either technique if you do not have access to a white coved studio (syce studio). See diagram 1 of how the set-up should look.


Diagram 1

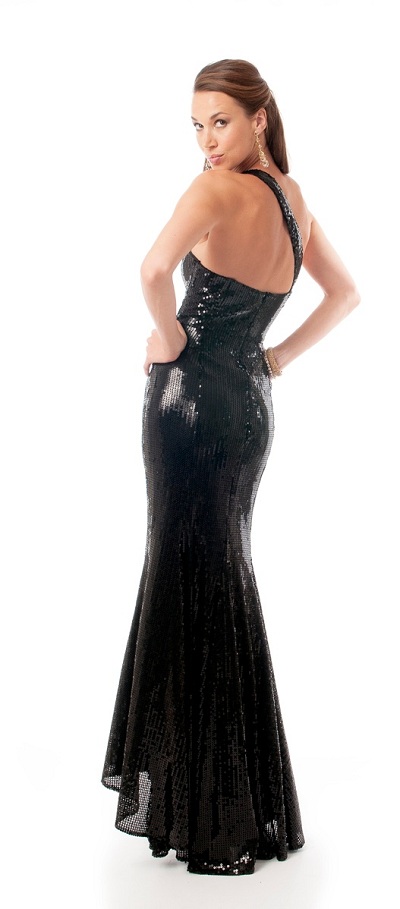
For the floor for your model to pose on you need an 8’ x 4’ sheet of very reflective white plastic sheeting, Perspex or Plexy glass are the best for this technique. This gives you a perfect reflection of the white wall when shooting at the right angle, i.e. above 42 degrees to the white reflective floor or perspex, mirroring the over lit wall but having a reflection of the models feet and legs, grounding your model so they do not float in empty space. [See the bottom of the black and the gray dress images in this article.]

You place the white reflective surface or sheet of perspex on a platform that’s 8’ x 4’x 18” high that’s very stable, you model will be standing on it. I use a sheet of ply wood at least 3/4’s of an inch thick on top of 9, 2” thick polyboards but you can build a purpose built platform if you have the resources to do so and you’re going to use it a lot.

You will need 6 to 8,  8’ x 4’ poly boards that are painted black one side and white the other side. I hinge mine with gaffa tape so I can create hinged L’s that stand up on their own to use as flags to block light or reflectors to reflect light. See illustrations below showing black flags and white reflectors.

I use 2 sets of L’s with the white side facing the white wall to reflect light that’s spilling around the back ground area but mainly to shield my camera position from the back ground lights which may cause some flared light hitting my lens degrading the quality of my images.

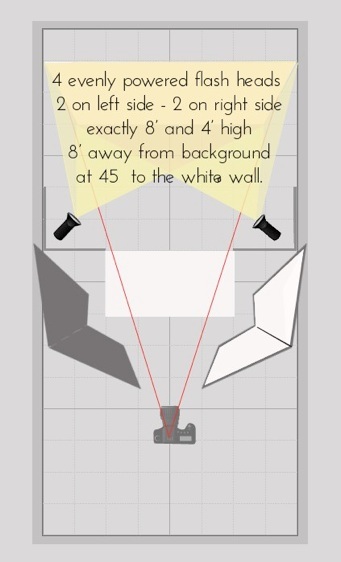
You will need 4 flash heads of the same power to to light the background evenly, (see diagram 2 below) I use 4 x 500 watt heads with 8” reflectors attached pointing towards the white wall at exactly 45 degrees,  2 medium light stands that reached up to 8’ from the floor and grips/clamps to attach the second head 4’ up from the floor and a head attached normally on the top of the stand.


Diagram 2

This is how they need to be set-up to give you an even spread of light right across and the full-height of your white wall or background.

I set the background lighting to be 1.5 to 2 stops over the aperture that I want to set on my camera, lets say I want to shoot at f8 to f11 so I need to set the power of all of these heads at the same level to give me a light reading of f16 evenly all over the white wall.

You can choose to use black flags or white reflectors dependent on how contrasty you want to light your model. I like contrast so I will often side light my model and use a black flag L on the opposite side of my key light, stopping any reflected light from the studio walls falling onto my model decreasing my contrast.

One key light flash head ~750 to 1,000 watts are enough for most of my studio fashion shots produced as clean whites. I usually put mine onto a large boom arm but a medium or heavy weight stand will do. To this flash head I attach which ever key light modifier I decide to use, for the sake of the illustration i have used a 24” beauty light, they are very popular right now.


Diagram 3

For this set-up I set the power of the key light to give me a reading of f8 to f11 at the models head position, 1.5 to 2 stops less than the reading of f16 on the back ground.

We are now ready to test the set-up without model. I will start by shooting an image showing the whole set-up.

I will do bracketed images in 3 steps either side of the correct reading i,e, f8.5  or f9.5 step less. This will show me at what settings I get my model, the background and the floor perfectly exposed,  from this I can adjust either my background or key lights power settings to give me the perfect clean white background.

I have set this set-up many times in studios that are very similar and had results that vary greatly so test this technique out for yourself in your own studio or home to see what results you get.

Clean white background (for limited studio space)

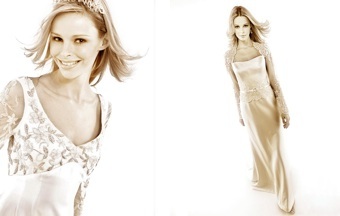
Diagram 4 (below) is an illustration of a simple clean white background set-up to use in limited studio space. The black and the gray dress images are both shot with this clean white background set-up.


Diagram 4

Equipment:

  • Camera: Nikon D300
  • Lens: Nikon 17mm to 55mm f2.8
  • ISO: 200
  • Shutter: 125th sec
  • Aperture: f8.5 -  f9.5

You can learn this lighting set-up plus many more of my lighting techniques for fashion hands on during my fashion photography courses, check out the schedule of courses that I am running this year.

Pic of the Day recap

$
0
0

This week’s notable entries come from Mr Photo Studios, Charles Parks, Juan Rodrigo, Mark Leighton, Mark Leighton, and more…

November 9, 2013


Photographer: Mr Photo Studios

Nothing like a nice warm winter coat to keep out those gusty November winds.

November 8, 2013


Photographer: Charles Parks

A whole new way of bearing with the winter cold.

November 7, 2013


Photographer: Juan Rodrigo

Ahhh, to be basking under the warm skies in Barcelona with the stunning architecture of Antoni Gaudí as a backdrop.

November 6, 2013


Photographer: Mark Leighton

Then there are those fantastic beaches in Portugal!

November 5, 2013


Model: Gurfateh Pirzada

“Damn cheap WalMart compass – I set sail for the sunny Caribbean and ended up in Toronto Harbour”

November 4, 2013


Photographer: Armond Scipione Photo

Winter in South Florida – the only ice here is in the cocktails ;)

November 3, 2013


Photographer and model: Sasha Gill

“T’was the month before Christmas, and all through my head, visions of Christmas trees danced there instead…”

--- Article Removed ---

$
0
0
***
***
*** RSSing Note: Article removed by member request. ***
***

Pic of the Day recap

$
0
0

This week’s notable entries come from Mystery Man Photography, Joepix, Carlier Photography, EButterfield, and more…

November 16, 2013


Photographer: Mystery Man Photography

“… and when the frost is on the pumpkin… It’s the time for…” a really great autumn image ;)

November 15, 2013


Photographer: Kyle Krueger

“a show-of-hands” says this is today’s choice.

November 14, 2013


Photographer: Joepix

“think… think… think… what should I wear?”  A smile works ;)

November 13, 2013


Photographer: Carlier Photography

“… but he said, if I moved my arm the whole thing would fall down.”

November 12, 2013


Photographer: EButterfield

“Chim-chiminey my butt – that’ll be $50.00”

November 11, 2013


Photographer: Kirill KAZAKOV

“Just hangin’ around in Kiev…”

November 10, 2013


Photographer: Gareth Byrd

“well… do something – I’m waiting”

Pic of the Day recap

$
0
0

This week’s notable entries come from Kandie Justine, JIMage Photography, Clarence Scott, Jeff Hiedeman, and more…

November 23, 2013


Model: Kandie Justine; Photographer: Barry Druxman; Makeup Artist: rochell leslie

A well dressed woman knows how to accessorize.

November 22, 2013


Photographer: Clarence Scott

“Asp not what your country can do for you… asp what you can do for your country”

November 21, 2013


Model: Ashleigh Kohler

“Which way did he go?” “He went thata-way!”

November 20, 2013


Photographer: JIMage Photography; Model: viktoria1989_nude

“Golightly. Holly Golightly. I live downstairs. We met this morning, remember?”

November 19, 2013


Photographer: Shiva Sharifi; Model: Ulorin Vex; Clothing Designer: Jane Doe Latex

Coco Chanel says, “One is never over-dressed or under dressed with a Little Black Red Dress.”

November 18, 2013


Model: Shaka Strong

“They’rrrrrre grrrrreat!!!!!”

November 17, 2013


Photographer: Jeff Hiedeman

“Danger, Will Robinson, Danger – imminent sugar overload!!!!”

Enter Pic of the Day

Upload your photo to enter PotD and your work could be featured here.

Model Mayhem’s December 2013 cover photo

$
0
0

Model Mayhem’s last cover photo of 2013 features Romanie Smith wearing Westward Bound Latex and was shot by Julian M Kilsby.


Model: Romanie Smith; Photographer: Julian M Kilsby; Clothing Designer: Westward Bound Latex

Romanie is a 19-year old model based in London, England, specializing in fashion, beauty, lingerie, latex and commercial work. She’s young, yet already very experienced, with a striking originality that fuses modern dynamics with a classical “English Rose” beauty. Romanie has featured in countless magazines and graced many catwalks. She has also modeled extensively for top latex design house, Westward Bound.

Like Model Mayhem on Facebook to see how it looks and to follow our latest updates.

Do you want to be our Facebook cover photo?

We’re accepting submissions from Model Mayhem members for 2014! So, if you’d like to be featured in an upcoming month, send a message to Model Mayhem Edu with a link to the image in your MM portfolio that you’d like to enter.


Pic of the Day recap

$
0
0

This week’s notable entries come from William Hill, Iris photo, JIMage Photography, Stevie Photography and more…

November 30, 2013


Photographer: Steven Williams PR

“Look into my eyes, deep into my eyes…”

November 29, 2013


Photographer: WilliamHill

“Who turned out the lights?”

November 28, 2013


Photographer: Irisphoto

“but Santa, I can be both naughty and nice”

November 27, 2013


Photographer: NYC Fashion and Beauty

“Can I put these down yet?”

November 26, 2013


Photographer: JIMage Photography

“…. and it keeps bees out too”

November 25, 2013


Photographer: Millar Photographics

“… and I can make bubbles in the tub too”

November 24, 2013


Photographer: SteviePhotography

“I washed it this morning and still can’t do anything with it.”

Enter Pic of the Day

Upload your photo to enter PotD and your work could be featured here.

The shot: Dance naked

$
0
0

Before we get started I should warn you that some of the images accompanying this article are borderline NSFW (Not Safe for Work) so if you’re at work or around children you may wish to come back later.

The original concept for this photo shoot was to capture movement. My inspiration was a song by John Mellencamp titled “Dance Naked.” A line in the chorus is “Spin round and round and round” and that’s what I wanted to capture. However, things didn’t work out as I envisioned and the resulting images are a spin-off of the original idea. Pun intended.

While the images do show blurred movement as I intended, I was unable to achieve the amount of spinning motion that I wanted because the turntable I used to spin the model isn’t really designed to spin people. I used one of those trays meant to go in your pantry to hold canned goods so you can reach the items in the back by spinning it. Although the model, Alexandra Tuchola, is petite at a little over 100 pounds, the turntable just wasn’t made for that much weight. It works great with a bottle of bourbon though!

So, we had to improvise and enlist some help from photographer Andy. (He was there because I was using his studio – thanks, Andy! He had to get down on the floor and manually spin Alex by her ankles, as you can see in this image:

It would have been great if Alex could have put one foot on the turntable and used the other foot to get herself spinning, but that wasn’t going to happen. Even with Andy spinning her we were not able to get much speed. There was no coasting and the motion was rather jerky. And as for dancing, poor Alex had a hard time just balancing much less trying to dance while being spun by the ankles. All I could really capture was partial turns, so I wasn’t all that pleased with the images we got. It just wasn’t what I had seen in my mind’s eye.

Here’s one of the images that almost shows what I was going for:


Photographer: Dean Johnson; Model: Alexandra Tuchola

So, what to do with a set of images that didn’t come out as planned? I thought about it for a few days and it occurred to me that ACDSee (a program I use for browsing and managing photos) has some filters that I had only played around with. I remembered one of the filters mirrored a portion of an image along a vertical or horizontal plane. I gave that a try and really liked what I saw, so I played around with it and saved a few of them.  The images still aren’t what I set out to do, but I think they turned out great anyway.

Below are a few photos and links to before and after examples.

Before: http://www.modelmayhem.com/portfolio/pic/34543225 (NSFW)

After:


Photographer: Dean Johnson; Model: Alexandra Tuchola

Before: http://www.modelmayhem.com/portfolio/pic/34543223 (NSFW)

After: http://www.modelmayhem.com/portfolio/pic/27815897 (NSFW)

Before: http://www.modelmayhem.com/portfolio/pic/34543222 (NSFW)

After:


Photographer: Dean Johnson; Model: Alexandra Tuchola

If you’re anything like me and not all that creative, you’ll find that sometimes your concepts just don’t work out as planned, but don’t let that stop you from at least trying to be creative. You never know—you may come up a new technique you’ve never done before. Fearlessly trying new things is a big part of being creative. You may not be able to make a silk purse out of a sow’s ear, but maybe there’s something else you could make out of a sow’s ear!

I still want to try my original concept again (anyone know a naked ballerina?) but until then, I’m pleased with what Alex, Andy and I were able to create.

Go forth and create – and dance naked!

Pic of the Day recap

$
0
0

This week’s notable entries come from Robert Sleeper, Niel Galen, Christopher Lee Grant, Gary Murison and more…

December 07, 2013


Photographer: Robert Sleeper

The new un-dress uniform for the US Marines

December 06, 2013


Photographer: Niel Galen

“I can see my planet from here…”

December 05, 2013


Photographer: Adam Quenneville; Model: Christopher Lee Grant

“The photographer said he was supplying the lights for this shoot – this is not what I had in mind.”

December 04, 2013


Photographer: Terry Slater

“…97 …98 …99 …100!! – Here I come!”

December 03, 2013


Photographer: Gary Murison

“wanna fiddle around, baby?”

December 02, 2013


Photographer: Waldemar Zagorski

“How to get home? I’m totally stumped!”

December 01, 2013


Photographer: Iain McNally

“… to Grandmother’s house we go…”

Enter Pic of the Day

Upload your photo to enter PotD and your work could be featured here.

Pic of the Day recap

$
0
0

This week’s notable entries come from StGeorge, Erika Lara Photography, Roy Nelson Photos, Brett Hunt, and more…

December 15, 2013


Photographer: StGeorge

The Good… the Bad… and the “do you have any twos?”

December 14, 2013


Photographer: Erik Lara Photography

“I once caught a fish this long.”

December 13, 2013


Photographer: Roy Nelson Photos

… and after a hard day of modeling, she was totally bagged.

December 12, 2013


Photographer: AJPhotographer

“Hey Doc, when I do this it hurts. What’s wrong with me?”

December 11, 2013


Photographer: Brett Hunt

Betchya a buck you blink before the cat does.

December 10, 2013


Model: Kristen Yohe

“Ha Ha Ha, very funny guys… so who’s got my dress?”

December 09, 2013


Makeup Artist: Nadja Hluchovsky

“… and when my mood changes I wear this one.”

Enter Pic of the Day

Upload your photo to enter PotD and your work could be featured here.

Pic of the Day recap

$
0
0

This week’s notable entries come from Alison Daniels, Christine Gerardi, John Carrasco, Liliana Gladwin,  Drew Smith and more…

December 21, 2013


Photographer: My lens and I; Model: Alison Daniels

“O Santa Claus, Santa Claus! Wherefore art thou Santa Claus?”

December 20, 2013


Digital Artist: Christine Gerardi; Photographer: CSW Photography

“Brrrrr… isn’t the snow supposed to be inside the snow globe?”

December 19, 2013


Model: John Carrasco

“… and the next item up for bid is this little fellow… or you can have what’s behind Door Number 2”

December 18, 2013


Photographer: RSMorris

“For that new Mercedes should I be naughty…. or nice?”

December 17, 2013


Photographer: Millar Photographics

“… and if this is another hat… come on gang, what about a pair of pants!!!”

December 16, 2013


Photographer: Liliana Gladwin

“… but I don’t want to be on top of the tree – that would hurt!”

December 15, 2013


Photographer: Drew Smith Photography

“So much shopping, so little time.”

Enter Pic of the Day

Upload your photo to enter PotD and your work could be featured here.

Pic of the Day recap

$
0
0

This week’s notable entries come from Nadja Hluchovsky, Paul Henry Serres, China White, Angelina the Stylist, and more…

December 28, 2013


Photographer: Millar Photographics

“Watch me pull a rabbit out of my hat.”

December 27, 2013


Makeup Artist: Nadja Hluchovsky

Today’s news is tomorrows fish and chips paper… or maybe not?

December 26, 2013


Photographer: Paul Henry Serres

“Boxing Day? I thought this was Football Day.”

December 25, 2013


Photographer: RSMorris

“Every Christmas it’s the same thing – dress me up in a silly outfit and take my picture – oh, the indignity!”

December 24, 2013


Model: China__White

“It rained all night… the day I left… the weather was dry…”

December 23, 2013


Wardrobe Stylist: Angelina the Stylist

“We three kings of Orient are… well it would have been three kings but the other two models (not from MM) flaked.”

December 22, 2013


Photographer: JIMage Photography

“Nobody puts Baby in a corner.”

Enter Pic of the Day

Upload your photo to enter PotD and your work could be featured here.

Model Mayhem’s January 2014 cover photo

$
0
0

Happy New Year from Model Mayhem!

Our first cover photo of 2014 features Anais Zanotti and was shot by Claude Taylor.


Model: Anais Zanotti; Photographer: Claude Taylor

Anais Zanotti is a French/Italian model, actress and skydiver stunt woman. She has 35+ magazine covers and has been featured in Playboy, FHM, Maxim, GQ, Cosmopolitan, People Magazine and many more publications.

Follow Anais Zanotti on Twitter and Facebook.

Like Model Mayhem on Facebook to see how it looks and to follow our latest updates.

Do you want to be our Facebook cover photo?

We’re accepting submissions from Model Mayhem members for 2014! So, if you’d like to be featured in an upcoming month, send a message to Model Mayhem Edu with a link to the image in your MM portfolio that you’d like to enter.


Pic of the Day recap

$
0
0

This week’s notable entries come from Nadja Hluchovsky, Vince Hemingson, CrowBloody, Indrek Galetin, and more…

January 4, 2014


Photographer: At_First_Glance

… as she steps through the portal at the end of the universe.

January 3, 2014


Makeup Artist: Nadja Hluchovsky

She held that pose for so long she grew roots.

January 2, 2014


Photographer: Vince Hemingson

“Damn over zealous tattoo artists – all I wanted was “Mom” on my arm.”

January 1, 2014 - Happy New Year!


Photographer: JAMES ROSS

“Damn economy – I lost my shirt in 2013…”

December 31, 2013


Retoucher: CrowBloody

“A little pixie dust here and a sprinkle there… and *poof* – the Obamacare website is all fixed!”

December 30, 2013


Photographer: Enterprise ca

Lake Ontario is not very warm at this time of year.

December 29, 2013


Photographer: Indrek Galetin

Proof that bald is beautiful.

Enter Pic of the Day

Upload your photo to enter PotD and your work could be featured here.

Nikon D3300 HD-SLR preview

$
0
0

Nikon has announced the D3300, an entry-level “HD-SLR” packed with features and technologies from the company’s more professional models. The D3000 includes a 24.2 megapixel DX-format (other companies call this size, APS-C) CMOS image sensor that does have an optical low pass filter (OLPF). Removing the OLPF boosts resolution and image sharpness. The EXPEED 4 image processor is also onboard, allowing up to 5 frames-per-second continuous shooting, helping capture more accurate colors, and improving image quality even at higher ISOs. Speaking of which, the D3300 has a pretty wide ISO range, from 100 to 12800.

The Nikon D3300 boasts Full 1080p HD video recording at up to 60p, along with full-time 11-point AF (autofocus). It is also the first Nikon HD-SLR to feature Easy Panorama Mode, one of four new Effects Modes that also include Photo Illustration, Super Vivid, and Pop. The official press release lists 13 In-camera Effects as well, but it’s not clear as to whether or not that includes, or is in addition to, the four mentioned above.

By the way, are you nervous about making the jump from point-and-shoot to an DSLR?

Nikon’s got you covered with Guide Mode, which helps beginners learn the basic functions of the D3300. In Guide Mode, you have access to four options: 1) Shoot photos using example images, to help you learn framing; 2) View/Delete; 3) Setup; and 4) Retouch, to fix images in-camera.

If you need Wi-Fi compatibility, the D3300 will work, but only if you purchase the optional WU-1a Wireless Mobile Adapter. From there, and with a free app, it’s easy to use smartphones and tablet devices as a remote control shutter button, or as an external “Live View” monitor display.

Nikon D3300 HD-SLR features:

  • 24.2-megapixel DX-format (APS-C) CMOS image sensor
  • no optical low pass filter (OLPF)
  • EXPEED 4 image processor
  • Full 1080/60p HD Video Recording
  • with Full-time AF (autofocus)
  • 3.0-inch Display
  • 100 – 12800 ISO
  • 11-point Autofocus System
  • 5 frames-per-second Continuous Shooting
  • Wi-Fi Capable (with OPTIONAL WU-1a Wireless Mobile Adapter)
  • 13 In-Camera Effects
  • 4 New Effects Modes
  • Photo Illustration
  • Super Vivid
  • Pop
  • Easy Panorama Mode
  • Guide Mode
  • Shoot Photos Using Example Images
  • View/Delete
  • Setup
  • Retouch (images in-camera)
  • Compact Body (4.9″ x 3.8″ x 2.9″)

The Nikon D3300 HD-SLR will be available this February (2014) — in black, red, or grey — as part of a $649.95 kit that includes the AF-S NIKKOR 18-55mm f/3.5-5.6G VR II lens. The kit lens will also be available separately for $249.95. And, finally, Nikon is introducing a new prime lens — the AF-S NIKKOR 35mm f/1.8G — that will hit stores on February 20, 2014 with a $599.95 MSRP.

(above includes OPTIONAL WU-1a Wireless Mobile Adapter)

Pic of the Day recap

$
0
0

This week’s notable entries come from NYC Fashion and Beauty, Colin Pierce Photography, Xaimara, Joe Polimeni and more…

January 11, 2014


Photographer: NYC Fashion and Beauty

It’s a long way to the top, but this is getting very close.

January 10, 2014


Retoucher: CrowBloody

The ayes have it.

January 09, 2014


Photographer: ColinPiercePhotography

A new twist on “Tea for two”.

January 08, 2014


Model: Xaimara

No slip up when we named this one our pic.

January 07, 2014


Photographer: Duke Morse

Basic black… and properly accessorized always makes a winner.

January 06, 2014


Photographer: Waldemar Zagorski

Not the best place to wait for your flight.

January 05, 2014


Photographer: Joe Polimeni

Some girls never seem to have anything to wear.

Enter Pic of the Day

Upload your photo to enter PotD and your work could be featured here.

Pic of the Day recap

$
0
0

This week’s notable entries come from FLOTO, Shaun Simpson, Coakes PhotographyDRock Photography and more…

January 18, 2014


Photographer: FLOTO

… and the winner of the Larry King Look-alike Contest is….

January 17, 2014


Photographer: Shaun Simpson

“STOP… in the name of love… before you break my heart…”

January 16, 2014


Photographer: Coakes Photography

“Oh Tonto, Tonto, wherefore art thou Tonto?”

January 15, 2014


Photographer: DRock Photography

“Quit horsing around, this is a serious game.”

January 14, 2014


Model: Renger Westerhof

WARNING: The Surgeon General thinks this is a great image.

January 13, 2014


Retoucher: Silke Touch

“hmmmm – when I said ‘carrot-top’ I was expecting a nice green”

January 12, 2014


Photographer: Wolf Steiner

“This is the forest primeval. The murmuring pines and the hemlocks… but who the hell ordered this damn road?”

Enter Pic of the Day

Upload your photo to enter PotD and your work could be featured here.

The Shot: Behind Glass

$
0
0

I want to preface this by stating that I did not and continue to not know what I’m doing. I just make things up as I go along and once in a while it actually works. This was one of those times and somebody decided I ought to write about it. So, here goes…

Inspiration and Concept

I’ve previously done a lot of work with models in showers and bathtubs; it’s kind of been my thing since I started working with models and was even my entire portfolio at one point. This is mostly because they have been the only locations in my home or hotel rooms that I feel are even remotely worth photographing. I work with available light and bathrooms are usually brighter than bedrooms—my last shower shoot afforded me the opportunity to shoot E-string in a nice glass shower which is something I don’t typically have. [http://www.modelmayhem.com/portfolio/pic/27454095 18+]

While new and fun, it was not without its problems. For one, if you’ve got a model in a shower they’re obviously going to want hot water which makes steam and fogs up the glass and your gear if it’s not something you’re prepared for. So you can either make the poor girl freeze or you spend most of your time wiping down the glass and your lens and less time actually getting great shots. By the time they’re posed right and you’re ready to take the shot of your life, the glass has fogged again. This shoot involved a lot of wiping the glass down and improvising. Also, if the shower is fully enclosed and you’ve got the fan and the water on the model probably can’t hear you give directions. It’s a fun little game of charades, especially if you try to tell them to hold a pose but they think you mean flail around. [http://www.modelmayhem.com/portfolio/pic/27469465 18+]

Shooting a model behind a wet pane of glass was something that I really wanted to explore more, but with less headache and more control. So, I took the idea out of the bathroom and onto my living room floor.


Photographer: Apodyopsis; Model: NevaehLleh

Technical Details

This is by no means the one true way to accomplish this effect, but it was the easiest and cheapest setup that I could come up with over a weekend when I had a model staying with me.

The shopping began at Home Depot, where I chose the sheet of Plexiglass I wanted. I decided on Plexi over regular pane glass partially for safety and price reasons, but mostly because Home Depot is open until 10pm and I didn’t know where else to pick up a giant single pane of glass that day.

I personally wasn’t sure if I was going to be shooting macro shots, head shots or full upper body shots, so I went for the biggest sheet I could fit in the car, which turned out to be roughly 4 x 4.5 feet. I typically shoot models that are pretty tiny so for my purposes it was large enough.

I then picked up some wood to make a frame. Plexi is unfortunately fairly flexible in large sheets, and I didn’t want it bowing in the middle or falling off its supports –this is one instance where regular glass would have been better.

In the end I opted to just Duct tape the Plexi to the wooden frame that I built because a) I’m lazy and b) I wanted to easily remove the Plexi and toss it in the bathtub to wash it—we’ll get to that in a minute.

Finally, something that I did not buy the first time around and highly recommend you do buy if you go the Plexi route is a specific Plexiglass cleaner.  As it turns out, the ammonia in typical household cleaners like Windex will eat up the Plexi, leaving it cloudy and scratched. Even your typical paper towel can leave scratches, so be careful. I wasn’t, and I now have a scratched piece of Plexi. While it’s still useable for what I want to do with it, you may take a far more detailed approach in your work and those scratches could become your worst nightmare. Obviously, this is another advantage of regular glass.

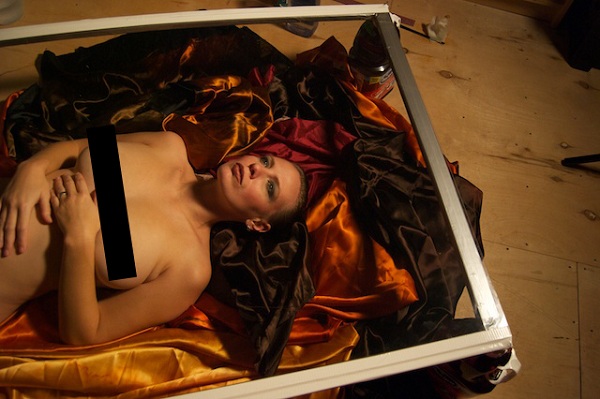
Once home and armed with a framed piece of Plexi more than half the size of myself, I had to find something to support it with. I decided that I wanted to set this up horizontally with the model lying flat beneath it. This would allow me to have full control over the liquid placed on top of it, rather than the uncontrolled streams, drips and constant reapplication that vertical glass limits you to. This is why I mention safety as a factor for picking Plexi.  I don’t need a giant sheet of glass suddenly shattering while someone is lying beneath it. (Who knows why that would happen, but I wanted to be sure it wouldn’t.) What types of material you use is entirely up to you, but know the pros and cons of each and be careful.

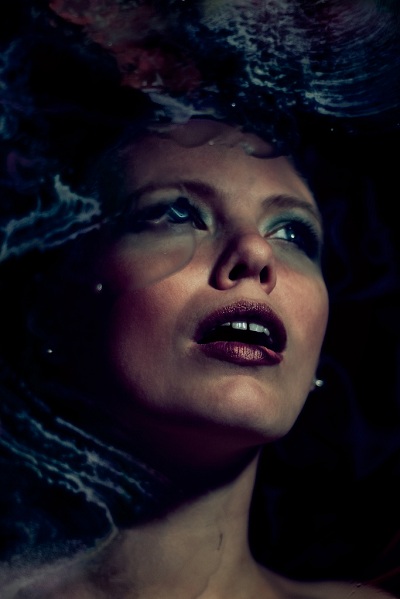
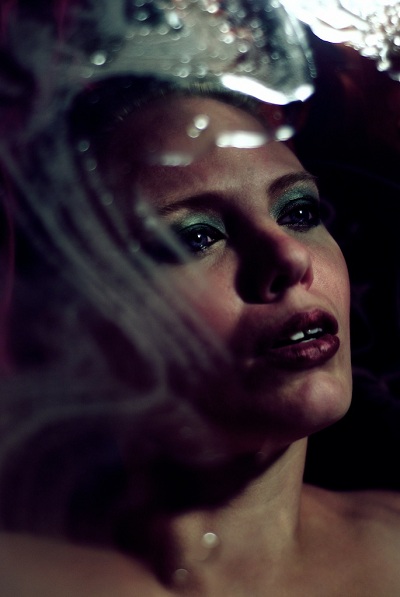
For supports, any four or more objects of the same height taller than a model lying on their back will do. I used four bottles of cranberry juice because that’s what was in my house. It doesn’t really matter what you use so long as it supports the glass and stays out of your shot. For me I wanted the glass very close to her body so these bottles were perfect. The Plexi sheet was only a little more than an inch or so above her. You might want it at some other height so boxes or chairs might work for you. Experiment until you get it right. Note that the closer the glass is to the model (combined with your lighting) the more defined the details from the liquid will be on their skin.


Photographer: Apodyopsis; Model: NevaehLleh


Photographer: Apodyopsis; Model: NevaehLleh

I laid down a plastic tarp/drop cloth beneath my setup. Make sure it’s bigger than your actual set (trust me).

I used a handful of differently colored silks as a backdrop, but in the end they didn’t really make much of a difference because I wound up just doing head shots. You can use anything you’d like from actual backdrop cloth or paper to fabric scraps, sheets, shower curtains, trash bags or whatever makes you happy.

I played around with a variety of liquids from water and clear cooking oil to clear dish soap. (This is why I needed to put the Plexiglass in the bathtub when I was done –you don’t just wipe off dish soap and cooking oil.) With the liquids I tried splashing them on, dabbing them on with a sponge, using a spray bottle and swirling them around with paint brushes and towels. I eventually just applied them with my hand. I wanted the liquids to be clear, but you could of course go with something opaque or colored. I didn’t completely cover the Plexi in liquid, but instead moved it around until it formed beads, puddles, streams, suds, etc.

Looking back, I should have bought an 8×11 inch piece of Plexiglass that I could try all these different options on and then easily rinse off rather than experimenting full-scale and making a big mess. I would absolutely suggest you go that route so if you don’t like a result you don’t need to dismantle your entire setup to fix it.

You’ll probably need a stool, chair or ladder to get high enough above your model. Try not to fall (She can’t catch you.)

I don’t have any lighting or camera advice to give. It really all depends on your skill, what equipment you’re working with and the final result you’re looking for. Personally, I worked with a single hot light because it’s what I have and I moved it around a lot. The advantage I found in using that rather than strobes is that I was immediately able to see where the highlights and reflections were on the liquid and glass and either move the light, move myself, or move the model. I have yet to try it again with a strobe.

This is what my setup looked like before I started making a big mess. It’s super fancy.


Photographer: Apodyopsis; Model: NevaehLleh

Post-production

My post work consisted of the usual cropping, straightening and skin touch ups, as well as contrast and color adjustments. I don’t have any specific advice to give in this area either, beyond doing what makes you happy.


Photographer: Apodyopsis; Model: NevaehLleh

Result

I got what I wanted, which is truly all I strive for and honestly don’t always get (it’s even better when the model is also happy with the results.) I personally learned quite a bit, from the need to actually think through my setup (before you’ve got a model lying on your floor trapped under a piece of glass covered in water) to how to manipulate a unique circumstance of light and shadow. This Plexiglass option definitely has its own set of merits and while I would not completely replace a shower for shoots with this setup every time, I do think knowing how to use both is valuable in achieving the right result. It’s definitely a setup that I plan on revisiting.

Viewing all 235 articles
Browse latest View live